How to make a Card in which Marie Antoinette Rides a Penny Farthing
I don't know why I wanted Marie Antoinette to ride a bike and a ridiculous bike at that in her underthings, but the magic of paper is that we can set convention aside and create what we want. The images were easy. I found a penny farthing image online and then used my Character Constructions stamps to create Marie. What took the longest amount of time, however, was figuring out how to make her pedal the bike. I wanted the wheel to go all the way around. My solution was certainly not the most elegant, but it works and puts a smile on the faces of those who see the beautifully coiffed Marie pedaling away on her bike. I don't know what you would say inside or on the front of this card, but in my mind it should be something fitting to the image.
"Wheel on by and join us for dinner."
"Throw caution to the wind and have a Happy Birthday."
Something like that, though I am sure you could come up with something better. Leave a comment and share your Marie on a Bike inspired sentiments.
Materials
-Penny Farthing image
-Marie Antoinette Stamp (Character Constructions)
-8.5 x 11 cardstock for card base (rose pink) cut to 7 x 10 and folded to 5x7.
-tiny brads (I use Tim Holtz Idea-ology MINI FASTENERS)
-hole punch (1/16") to get the holes smooth a hole punch is best, but a paper piercer works too
-tool to cut circles (whatever works for you, I use a Cuttlebug and Spellbinders dies, but a compass, pencil and scissors works too.)
-background paper cut to 4.5x6.5" (mine is Hester by Melissa Frances)
-colouring tools of choice (I used various alcohol based markers)
-Simply Smooth or similar paper to stamp image (card weight)
-card weight paper to create mechanisms (these can be anything as they won't be seen and so are a great use for scraps)
-chipboard circle (if you have one available and are using that mechanism choice)
 Stamp the Marie image twice. You will need to colour one image entirely and the left arm and leg of the second image. You need two because you need two left arms (one of which we will make be her right arm) and two left legs so that she can have a knee joint. Also cut out the bicycles. One completely and as closely as possible. From the other bike, cut out only the front wheel.

Cut out one Marie entirely. I used the handy Studio Assistant die that goes with the stamp. One note: make sure you correctly position the stamp on the block. Use a die negative, the one you will use later to position the die on the stamp, to make sure that the stamp is on the block straight.
Step 1.
 Stamp the Marie image twice. You will need to colour one image entirely and the left arm and leg of the second image. You need two because you need two left arms (one of which we will make be her right arm) and two left legs so that she can have a knee joint. Also cut out the bicycles. One completely and as closely as possible. From the other bike, cut out only the front wheel.
Step 2.

 |
| Use the registration marks to centre the die on the stamp. |
Step 3.
Step 4:


 Use brads to put Marie together and set aside.
Step 5:
Use brads to put Marie together and set aside.
Step 5:
 Once you find the center of the circle push a pin through it into the wheel. Position the bike on the card front and transfer the pin hole to the card front.

 Here's how Marie sits on the bike. The one space where her leg was cut off allows her to straddle the bicycle seat.

 Once you have the pin hole use it to mark a set of cross hairs. Use a pencil with a well sharpened lead. Put the point of the lead into the pin hole and move the ruler up against the lead and draw a line through the point. Repeat this process to create another line at 90 degrees to the first line. A See through ruler is great for this. The lines then let you accurately center the scrap circle that is going to be the same size as the opening you will create in the card front. Just match up the cross hairs on both, or the pin holes.

 Follow the same process to cut the hole in the center of the bicycle wheel.

 Cross hairs and scrap circle taped in place.
 and the matching holes cut. If you have a chipboard circle for the mechanism, cut a circle just bigger than the chipboard. It doesn't need very much play as the chipboard circle creates a very smooth mechanism. Once you have both items with holes, glue the bicycle down to the front of the card. Be sure to keep the seat and handlebar area free of glue so that Marie can be properly placed on the bike.
 Use the previously described method to find the center of the circle. This circle is about 2 1/2" in diameter, but could be as small as 2". This time we will trace the center circle matching the hole size we've cut in the bicycle and card front but we won't cut it out. Instead, as shown in the picture, trace another circle about 1/8" further out from the first one, but only between the cross hairs opposite to each other. Cut the lines indicated in pink, being careful to cut up to but not past the inner circle.
 You'll also punch a hole as indicated (about 5/8" in from the edge of a 2 1/2" circle).
The flanges that this creates gets pushed through the card front. Don't be afraid to bend the second flange that you are pushing through to the front.
You'll also punch a hole as indicated (about 5/8" in from the edge of a 2 1/2" circle).
The flanges that this creates gets pushed through the card front. Don't be afraid to bend the second flange that you are pushing through to the front.


 As you can see, the chipboard circle needs to be at least a wee smaller than the hole you will cut into the bicycle and card front. Also, if you find a larger chipboard circle than I have, cut your hole to accommodate it.

 The hole that you punch into the mechanism circle to accept the shaft needs to clear the chipboard circle that you are using, so this placement is a suggestion.

 This mechanism will only produce a quarter turn of the bicycle wheel, which makes me sad, but if you'd rather go for straight forward push pull and reliability, this mechanism has much to recommend it. Use the same set up to create the flanged circle, then cut it down to an oval. Another oval is then bradded to the push/pull shaft. The sizes only matter in that they all need to fit under the card. You will also need to make a collar to hold the shaft in place. It should only be slightly bigger than the shaft and glued to the back of the card front. Arrange as shown in this photo.


 The final parts ready for assembly.
 Brad the shaft to the hole punched in the circle.
 Mark about 1/4" to either side of the shaft when it is pushed in as far as possible. Cut a circular indentation to make grabbing the tab easier.
 Attach pull tab to circle using a brad.
 If you used the chipboard circle method, just place it down, centre card front over top and put some liquid glue on it.
 Position Marie on her bike over the bike on card front so that everything lines up and glue to chipboard circle.
 Then use some 1/16" pop dots to fix Marie in place. Be sure to keep the brads for her arms free.
The last mechanism step is to make a collar for the pull tab. Any piece of scrap card will work. Use the photo for guidance. Folding in a flare results in smoother operation. Add more pop dots to the back of the card front and affix to card base.
Then use some 1/16" pop dots to fix Marie in place. Be sure to keep the brads for her arms free.
The last mechanism step is to make a collar for the pull tab. Any piece of scrap card will work. Use the photo for guidance. Folding in a flare results in smoother operation. Add more pop dots to the back of the card front and affix to card base.
 And then she's done.

 |
| Cut Marie into pieces as shown. |
 |
| These are the pieces you will use for the card. |
 | ||||
| This is how Marie will go together. Use a 1/16th inch punch and Mini Fasteners. |


You will need to find the center of all the circular items that you are going to use: the bicycle, the separate wheel, the circle for the back of the mechanism, the chipboard circle (if you are going to use that). To find the center of a circle the easiest thing to do is to trace the circle onto some thin scrap paper. Cut the circle out and then fold it in half and then in half again. Where the two fold lines cross, voila, there is the center of the circle.


Step 6:
I used spellbinders to cut the circles into both the bicycle and card front. I actually used just a thin piece of removable tape to hold the circle in place and then fit the spellbinders die over it to get an accurate cut.


Step 7: Mechanism Preparation
Mechanism #1

 You'll also punch a hole as indicated (about 5/8" in from the edge of a 2 1/2" circle).
The flanges that this creates gets pushed through the card front. Don't be afraid to bend the second flange that you are pushing through to the front.
You'll also punch a hole as indicated (about 5/8" in from the edge of a 2 1/2" circle).
The flanges that this creates gets pushed through the card front. Don't be afraid to bend the second flange that you are pushing through to the front.

Mechanism #2
The chipboard circle solution. After doing this card three times, this solution popped into my head. Sometimes my head doesn't work as fast as I'd like sometimes. This is by far the smoothest, easiest way to do this. As far as finding a chipboard circle, I mined my chipboard alphas. A's , O's, and G's often have circles that are to be thrown away. You can also find just chipboard circles at places like my home roost, Bizzy B's.


Mechanism #3
See Martha Stewart's Happee Birthday Card.

 This mechanism will only produce a quarter turn of the bicycle wheel, which makes me sad, but if you'd rather go for straight forward push pull and reliability, this mechanism has much to recommend it. Use the same set up to create the flanged circle, then cut it down to an oval. Another oval is then bradded to the push/pull shaft. The sizes only matter in that they all need to fit under the card. You will also need to make a collar to hold the shaft in place. It should only be slightly bigger than the shaft and glued to the back of the card front. Arrange as shown in this photo.
Step 8:
Attach Marie to the bicycle. Put a hole through her tiny little foot and through the pedal of the just the bicycle wheel.


Step 9:
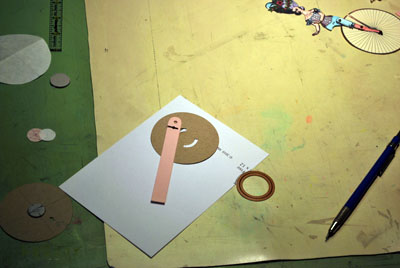
Create push/pull shaft. It should be about 4 1/4" long. Use a 1/2" x 8 1/2" strip of paper the same colour as the card. Fold in half and glue. For added strength, bury a thinner strip of paper in between the two layers (ie. 3 layers of paper). Punch a hole near the end and round edges. (rounded edges are less likely to catch on the mechanism).


Comments
Post a Comment